
The Job Nobody Warns You About Until the Net Is Out of the Bag
You ordered a replacement net. It arrives folded into a package roughly the size of a loaf of bread, and it comes with no instructions, because the assumption is that you already know. Then you unfold it in the yard and it becomes clear that this thing is going to take a while.
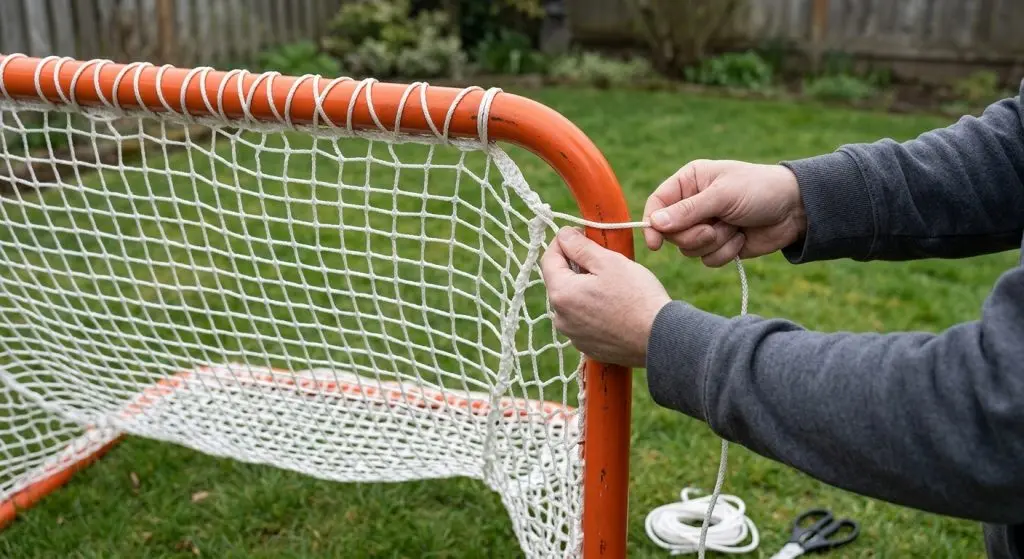
Knowing how to lace a lacrosse net is mostly about sequence and tension rather than skill. You attach the top edge to the crossbar first, then work down both sides, then the bottom, threading cord through the net’s edge openings and around the frame as you go, and you don’t pull anything fully tight until the whole net is on. Budget 30 to 45 minutes the first time.
The rules side is simple. Neither the NCAA men’s nor women’s rulebook specifies a lacing pattern. What they require is that the net be fastened to the posts, crossbar and ground so a ball can’t pass through, with mesh openings not exceeding an inch and a half. How you get there is up to you.
What you need before you start
Short list, and getting it right saves the job.
- The net, matched to your frame’s corner shape. Round-corner nets fit goals whose top corners curve; square-corner nets fit welded right-angle frames. If you’re mid-purchase and unsure which you have, or which twine thickness to get, the net thickness guide covers both decisions.
- Lacing cord. This is a consumable and it wears out before the net does. Goal lacing cord is sold separately for exactly that reason. Old cord that’s gone stiff or frayed is worth replacing at the same time as the net.
- Ground anchors or stakes for the back edge. The rules require the net be fastened to the ground, and an unanchored back edge lifts and lets balls through underneath.
- Scissors, and gloves if the cord is thin. Forty minutes of pulling cord through mesh is harder on your hands than it sounds.
One thing you don’t need: a second person. It’s easier with one, but it’s a solo job.
How to lace a lacrosse net, in order
The sequence is what keeps the net from ending up crooked. Work in this order.
1. Lay the net out behind the goal, oriented correctly. The net has a shape — a wide front edge that matches the goal opening and a narrower back that gets staked down. Unfold it fully and figure out which edge is which before you attach anything. This is the step people skip and then redo.
2. Attach the top edge to the crossbar first. Start at one top corner and work across. Thread the cord through an opening in the net’s edge, around the crossbar, and back through the next opening. Leave the cord loose — you’re placing the net, not tightening it yet.
3. Work down both side posts, alternating sides. Doing one full side then the other pulls the net off-centre. Go a foot or two down the left, then the same on the right, and keep it even.
4. Slow down at the corners. Corners are where nets sag and where tension goes wrong. On a curved frame, you’ll want a pass through every opening around the bend rather than skipping alternate ones as you can on the straights, because the curve wants to gap.
5. Do the bottom edge along the base bar. Same approach, still not fully tight.
6. Now tension it, from the top down. Go back to the crossbar and work through the whole net taking up slack evenly. This second pass is the difference between a net that looks right and one that bags in the middle.
7. Stake the back edge to the ground. Pull the net back and down and anchor it. This is what stops balls slipping under and what gives the net its shape.
8. Tie off and trim. Finish with a knot that won’t work loose, and leave a few inches of tail rather than trimming flush.
Then take a ball and throw it at the corners and the bottom edge specifically. If it slips through anywhere, that’s your gap.
Every other opening, or every one?
The common approach on the straight runs is to pass the cord through every other opening in the net’s edge — it’s faster, uses less cord, and holds fine. Around the corners and along the bottom, go through every opening, because those are the places that gap under load.
If your goal takes hard shooting from older players, err toward every opening throughout. It’s slower to fit and slower to remove, and it sags less.
The two alternatives to lacing
Lacing isn’t the only way to attach a net, and if the job above sounds unappealing, it isn’t your only option.
| Lace-on | Bungee fasteners | Velcro net | |
|---|---|---|---|
| First fit | Slowest — 30–45 min | Faster | Fastest |
| Removing it | Slow | Quick | Very quick |
| Best for | Goals that stay set up; program use | Retro-fitting, and replacing failed lacing | Seasonal setups, frequent swaps |
| Watch out for | Cord wears out and needs replacing | Elastic loses tension over time | Fewer thickness and corner options |
Goal fastener bungee cords come 24 to a bundle in black, and they’re weather-resistant. They’re genuinely useful in two situations: you want the net on faster than lacing allows, or your existing lacing has failed in a few spots and you want a repair that doesn’t mean redoing the whole net.
A Velcro net skips the problem entirely. It’s a 6.0 mm universal-corner net that attaches with Velcro rather than cord, and it’s the right answer if you take the goal down every off-season or swap between nets. The trade-off is choice: the lace-on range spans four twine thicknesses and both corner styles, while Velcro is one configuration.
If you’d rather watch than read, Gladiator’s assembly instruction videos include one on fitting the net.
Common mistakes, and how to tell you’ve made one
The net bags in the middle. You tightened as you went instead of doing a separate tensioning pass. Fixable without starting over — work through the top and sides taking up slack.
One side sits higher than the other. You laced one full side before the other. This one usually needs a partial redo.
Balls slip under the back edge. The back isn’t anchored, or the anchors have pulled out of soft ground. Re-stake, and use more anchor points than you think you need.
Gaps at the corners. You skipped openings around the curve. Go back and add passes through the corners specifically.
The cord snapped mid-season. That’s normal wear on cord that was already old. Bungee fasteners are a fast field repair; new lacing cord is the permanent fix.
Bottom line
Attach the top, work down both sides evenly, go through every opening at the corners, and don’t tighten anything until the whole net is on. Anchor the back edge properly, because that’s where the cheap goals-in-the-yard arguments come from. And if the whole process sounds like something you’d rather not repeat every spring, a Velcro net or a bundle of bungee fasteners is a legitimate answer rather than a shortcut.
A Word on Gladiator Lacrosse
Gladiator Lacrosse was founded in 2012 by Rachel Zietz, a 13-year-old player in Boca Raton whose backyard gear kept failing. Durability was the original problem, which is why the net range runs as deep as it does and why the parts that wear out are sold separately instead of forcing a whole replacement.
The replacement net lineup spans 5.0 mm through 7.0 mm in round, square and universal corner styles. Goal lacing cord and goal fastener bungee cords are both stocked as separate items, and the 6.0 mm Velcro net exists for anyone who’d rather not lace at all.
You Might Also Like
- Replacement nets — twine thicknesses, corner styles and attachment types
- Lacrosse net thickness explained — which gauge to buy before you lace anything
- Assembly instruction videos — the visual version of this job
FAQ
How long does it take to lace a lacrosse net? Around 30 to 45 minutes the first time, and noticeably faster once you’ve done it. Most of the time goes into the corners and the final tensioning pass. It’s a one-person job, though a second pair of hands helps hold tension while you tie off.
Do you lace through every opening in a lacrosse net? On the straight runs along the crossbar and side posts, every other opening is common and holds fine. Around the corners and along the bottom edge, go through every opening — those are the spots that gap under load. If the goal takes hard shooting, use every opening throughout.
What cord do you use to lace a lacrosse net? Purpose-made goal lacing cord, sold separately because it’s a consumable that wears out before the net does. Cord that’s gone stiff, frayed or brittle should be replaced at the same time as the net rather than reused.
Can you attach a lacrosse net without lacing it? Yes. Bungee fasteners attach a net faster than cord and are useful for repairs where lacing has failed in a few places. A Velcro net skips cord entirely and is the practical choice if you take the goal down each off-season. The trade-off is fewer thickness and corner options than the lace-on range.
Why does my lacrosse net sag in the middle? Almost always because it was tightened section by section during fitting instead of in a separate pass at the end. Attach the whole net loosely first, then work back through from the crossbar down taking up slack evenly. Sagging at the back edge instead usually means the ground anchors have pulled out.